Campaign Manager - Campaign Manager (Silverlight)
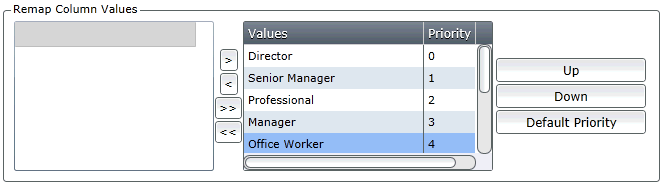

Prioritize List

Use the Prioritize List tool to rank text columns according to a defined criteria.

For example, it can be used to rank job titles before performing an N per X operation to enable you to select the most prestigious job titles per household.

The tool provides similar functionality to the Rank by X tool.

Procedure

  1. Drag the Prioritize List tool to the Workspace.
  2. Choose the join operator.
  3. Click the icon to the right of the New Prioritize List field, a new window opens.
  4. In the Display Name field, enter a name for the column.

If you save the tool as a template, this name will be used to display it in the Templates tab. The Display Name is also used in the Caption area if you insert the tool into a document.

  1. If you want the new column to be automatically indexed, select the Index Column check box. You should only index columns when necessary. For example, when engineered columns have > 250 discrete values, indexing can start to improve query performance.
Note: The default value for the Index Column check box is unselected. If you import a Campaign Manager document with the Index Column check box selected, the check box will revert to unselected. This is because when you import an existing engineering node, you are effectively creating a new one and the check box default of unselected is applied.
  1. Optional setting: if you want to make the column permanent, so that it is available to view and select in the Data Explorer, click the Optional expand icon. In the Table Column Name field, enter the name you want to use to display the column in the Data Explorer tab.
  2. Configure the remaining settings:
    • Column Values to Rank: Select the column which will be used as the basis of the rank, for example Job Title. A Remap Column Values grid is displayed with all the values in the selected column.
    • Use the arrows to move all or some of the values to the right hand column where you can allocate a priority to each by editing the Priority field. The highest priority will have a rank of '0'.
Note: Multiple column values can have the same priority rank. Click the column headings to sort the grid by either the Value or the allocated Priority. Select 'Default Priority' to reset the grid back to the default.

  • Group by Column: This is the column that links the ranked column values and which is used to group them together for ranking. It would usually be a key column like Customer ID or Household ID. The selected ‘Group by Column’ must exist in the same table as the ranked column, so in our example we select Household ID from the Customer table not from the Household table. All processing for this tool takes place in a single table.
  • Group by Sort Order: Selecting Descending will allocate the highest value with a rank of ‘0’. Selecting Ascending will allocate the lowest value with a rank of ‘0’.
  • Filter Segment: Add a standard report filter to reduce the scope of the results.
  • Copy Values To: The Copy Values To tool is often used in conjunction with this tool to create columns at higher database levels based on the rank of fields in foreign tables. This option allows the user to create this link directly. Click on the drop-down to select the Copy Values To tool or the First or Last tool which will select the first or last value from your ranked column.

Click Run Processes to create the Prioritized List.

  Online & Instructor-Led Courses | Training Videos | Webinar Recordings
© Alterian. All Rights Reserved. | Privacy Policy | Legal Notice